How to fix the following problems of LCD Screen
1. Pressure marks on the laptop screen
2. White spots on the tv screen
3. The bright spot on tv
4. Dark spot on the tv screen
5. White cloud on LCD tv screen
6. Spots on the tv screen
Introduction
There are many reasons why your LCD screen might have pressure spots. Here’s what you need to know about them and how to fix them if they happen to you.
What is a pressure mark on an LCD screen?
If you’ve ever had a white spot appear on your LCD screen, chances are it was a pressure mark. Pressure marks are caused by pressing on the screen. They can be difficult to get rid of and may not go away completely, but there are some things you can do to minimize their appearance of them.
Pressure marks most often show up when something heavy is placed on top of your laptop or if someone presses down too hard on the screen while touching it with their fingers (for example, playing games).
What causes white spots on the LCD screen?
Pressure marks can be caused by:
- External forces. You may have sat on a pressure spot, and it has left an impression on the screen. This is usually the reason for those visible indentations in your LCD screen that can easily be felt with your fingers.
- Static electricity. Static electricity can build up on clothing such as wool or cotton, which then rubs against the surface of an LCD monitor when you move around and touch its surface. When this happens, you’ll get a little spark (which might not be seen), and a small white spot will appear on your monitor where there was contact between clothing material and screen material at one point during use.
- Heat-related issues affect many things, but they can also cause problems with LCD monitors if they’re left running too long without being shut off or cooled down properly through air conditioning systems or fans placed strategically around them so that air flows freely within their vicinity at all times during operation—this will keep temperatures cool enough, so there isn’t likely any damage done via overheating over time!
The LCD monitor has a fried screen.
The LCD monitor has a fried screen. This is the most common and serious of all screen problems because it means that your computer can’t display anything on its own, not even a blue screen with white text telling you to restart your computer or press Ctrl+Alt+Delete.
To fix this problem, first, unplug the power cord from both ends of your laptop: one end goes into your wall socket, and the other end goes into either side of your laptop (maybe even both). Then, look at what’s behind your laptop: if there’s any visible light coming out from underneath or around it (like when you’re playing games), don’t touch anything else because they might damage whatever components are still connected up there! The best thing to do next would be to open up one side panel off until everything looks like this picture below (yes, I know it’s blurry but hopefully enough for reference purposes):
If there isn’t any visible damage, then just replace any fuses/circuit boards which might have been fried during use by opening up more panels.
To replace the LCD screen, you must first remove the damaged one.
To replace the LCD screen, you must first remove the damaged one.
First, remove all latches and screws that hold it in place.
Next, use your tools to pry up on one side of the old display unit. This will release some tension on the other side and allow you to lift it off with minimal force. If there are any cables connecting it to other parts of the phone (such as power), gently disconnect them before continuing. Then set aside and keep track of this piece so that you can re-install it later if necessary!
You should also take this opportunity while everything is exposed to clean out any dust around where your new screen will be installed as well as inside any chip openings or sockets that may have become clogged during use due to being exposed over time in normal operation conditions such as dust buildup or corrosion caused by moisture exposure due being left open too long after washing hands etcetera.
Remove the latches and screws to dislodge them.
If your computer monitor is less than 3 years old and you’ve never moved it, the pressure from sitting on a desk may be causing permanent damage. To fix this problem, you’ll need to remove the cover from your computer monitor and then lift off the screen from its hinges.
Once you’ve done so, look for any latches or screws that are holding it in place. Use a Phillips screwdriver to remove these if necessary—make sure not to slip when doing this, though!
Set up your tools before starting.
Before starting, ensure you have all the tools needed for the job. You’ll need a screwdriver to remove the screws in your laptop and computer monitor. A heat gun is also helpful for removing any adhesive that may be holding your LCD screen in place. A lint-free cloth can be used to wipe away any dust or other grime from your monitor before beginning this repair process; however, do not use harsh chemicals on the screen because they can damage it permanently! Finally, marking tools such as a sharpie marker will help guide you during installation so that everything lines up properly when reassembling it later on.
Once you have all these things ready at hand, you’re ready to start taking apart your broken laptop!
Clean the PCB surface carefully with rubbing alcohol.
The PCB is the film on the back of your LCD screen, and it’s what causes pressure spots. To clean it, you’ll first need to remove any residue from your cleaning cloth. The best way to do this is with rubbing alcohol; just use a few drops on a clean cotton rag and wipe down the cloth until there are no streaks left behind. You can also use a lint-free microfiber cloth like this one if you don’t have to rub alcohol handy, but be sure that said cloth doesn’t contain particles that could scratch your screen!
Now take this cleaned rag (or microfiber) and wipe down the whole back of your LCD display with it—make sure not to press too hard against any part of its surface, or else you risk creating more pressure marks than before! You’ll want to do this step twice: once dry and once dampened with water or glass cleaner (don’t use window cleaner!).
Afterward, move on to Step #3 below for the final polishing steps (which we recommend), such as using silicone spray or compressed air if needed.)
Use a lint-free cloth to clean out the dust from around the display surface and chips.
Use a lint-free cloth to clean out the dust from around the display surface and chips. If you have an antistatic cloth, that is best because static electricity can harm your computer’s hardware. If you don’t have one, any soft fabric will do. Use just enough rubbing alcohol to dampen the cloth; this will help remove fingerprints or smudges on your computer screen. You might need to use more than one piece of paper towel if there are lots of smudges on your LCD monitor screen.
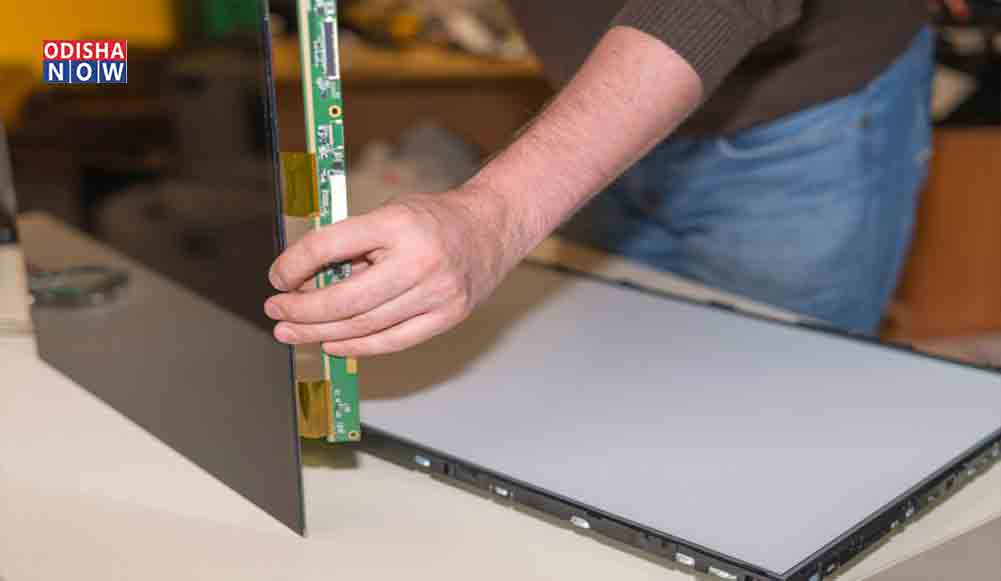
Once the LCD is removed, you can access the board easily for installation and removal.
The LCD is now fully removed from its housing. You can access the board easily for installation and removal.
In order to install or remove an LCD, carefully clean the PCB surface of any dust particles with a cotton swab or microfiber cloth. Be careful not to scratch or damage any components on the PCB with your cleaning materials.
It’s important to note that some screens have sharp edges around them, in which case you may need to use tweezers to gently pull out any debris trapped behind them before attempting the installation again.
Install LCD over screws
When replacing the screen, ensure the screws are tightened properly, and the LCD is properly aligned. Also, make sure that it’s not touching either the frame or any other part of your device. If you are having trouble with pressure spots after installing a new LCD, try increasing your screen brightness to around 80%. This should eliminate any remaining pressure spots on your new display and allow it to look as good as possible.
Conclusion
With the above steps, you should be able to fix pressure spots on the LCD screen. First, you should take a look at the problem and try to find out what caused it. Then, remove the damaged part and replace it with a new one. Finally, make sure that you mount it correctly so that there won’t be any more problems with your monitor in the future as well.